Poll with ResponseApps
Launch OMBEA Response
- Click on the OMBEA Response icon. This will either be on your desktop or in your start menu in a folder called OMBEA Response.
- Microsoft PowerPoint will load up and you will see the OMBEA Response ribbon along the top of your screen.
A Common mistake that people make is trying to launch OMBEA Response when Microsoft PowerPoint is already running. Since OMBEA Response launches as part of PowerPoint, you will need to ensure PowerPoint is closed before you double-click on the OMBEA Response Icon.
Connect your ResponseApps
Background
Your ResponseApps communicate with your presentations via an Internet connection. The ResponseApp knows which voting session is yours by way of a unique 6 digit code, known as a Session ID, that is randomly generated each time you set up a new voting session. You may also pick a custom Session ID. To learn how to do this, read our article on Defining a Custom Session ID through OMBEA Connect.
On the OMBEA Response ribbon, click the ResponseApp button.
A panel opens and you should see a space for you to enter your ResponseApp username and password. You will have been sent these by email. If you have forgotten your password, click here to request a reminder.
Click Login.
You will see a new 6 digit Session ID.
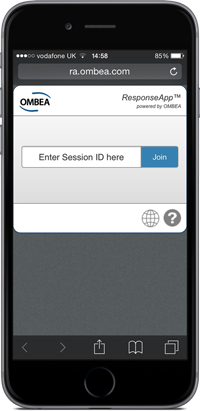
Take any web-enabled device, such as an iPhone, and launch a new internet browser window.
In the web address bar, type ra.ombea.com.
The ResponseApp page loads up and asks for your Session ID.

Type in the Session ID generated in step 4 above and click Join.
Your ResponseApp is now connected to your voting session.
When working with a live audience you can use a QR code on your slide to direct them to ra.ombea.com.
If you need to remind audience members of your ResponseApp Session ID midway through your presentation, hit F11 on your computer keyboard.
Run your presentation with ResponseApps
Background
In OMBEA Response we collect votes from our audience by running our interactive PowerPoint slides in presentation mode.
Run your presentation. We’ve placed a big button on the OMBEA Response ribbon called Start Polling. This button simply starts your presentation at the first slide. You do not have to use this button since PowerPoint offers many ways to start a presentation, and all of them will work.
Advance through your slides using your normal PowerPoint keys.
When you reach a question slide, the OMBEA polling box will appear in the top right hand corner to indicate the number of votes collected. The box will be green to indicate that polling is open.
Invite your audience to vote using their ResponsePads or ResponseApp devices. As they do so, the response counter will rise to indicate the votes coming in.
When you are satisfied that you have enough votes, close polling by pressing your normal PowerPoint advance slide button. This will work with either the space bar, right arrow key, down arrow key, or any presentation remote you are using.
Your chart will appear to show everybody the results of the polling.
Keep advancing through your presentation, collecting votes as you go.
When you have finished presenting, remember to save your data. With OMBEA Response simply save your presentation in the normal way. Your presentation will be saved an an ‘ORS’ file containing both the slides and the voting data. To learn more about saving data and OMBEA’s file types, read our article on Data and Reporting.
We can ask OMBEA Response to simulate votes for us so that we can check our presentation is working as intended, without needing to plug in the receiver and use handsets for voting. Just click Simulated on the OMBEA Response tab.
OMBEA Response 360’s chart window is transparent which means it can sit atop another presentation tool and appear to work seamlessly. You’ll find a detailed guide in

